Feeds:
Posts
Comments


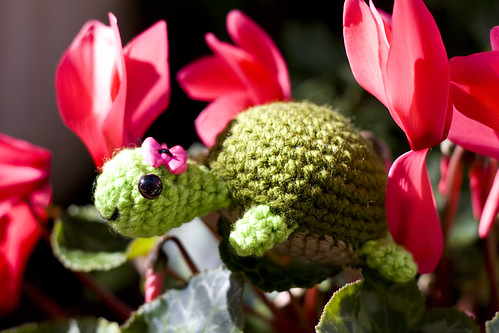
Pania swam up to me one cold stormy day as I strolled along the shore. She was ever so tired of the wintry ocean and longed for the warmer seas. I suggested she spend the winter ashore in my warm cosy house, and she heartily agreed.

She has found herself quite at home here and seems to have become best friends with Miss Octopus, both of whom have a love of the ocean and ocean jewels. She has been entertaining me with tales of her namesake, Pania, the mythical Maori maiden of the reef, and as a thank you for my hospitality she has agreed to share how you too can have your very own turtle visit.

Pania the Turtle (or Tortoise!) Amigurumi Pattern

My patterns are written down as I create my amigurumi, but let me know if there is anything missing.
 

Techniques

You will use the basic amigurumi crochet techniques: magic circle, slip stitch, single crochet (sc), increase, and invisible decrease. The pattern gets you to practice making a flat circle and a half sphere.
Note: US crochet stitch terminology is used. ch=chain, sc=single crochet, 2sc in next sc=increase, sc2tog=decrease (crochet two sc together to make one sc). I use the invisible decrease method for all decreases. 

Materials

* Yarn: Dark Green (Shell), Light Green (Head, legs, tail), brown (underside) (your turtle can be different colours of course! These are just what I used)
* Safety eyes (I used 7mm). You can also stitch your eyes or make them out of felt
* Black embroidery thread (for mouth)
* Polyfill stuffing
* Crochet Hook (I used 3.5mm)
* Needle (one with an eye big enough for yarn, and one for your embroidery thread)
* Any other materials to decorate 

Pattern

Turtle: Shell

Dark Green Yarn
RND1:  6sc magic circle [6]
RND2:  2sc in each sc [12]
RND3:  sc in next sc, 2sc in next sc. Repeat. [18]
RND4:  sc in next 2 sc, 2sc in next sc. Repeat. [24]
RND5:  sc in next 3 sc, 2sc in next sc. Repeat. [30]
RND6:  sc in next 4 sc, 2 sc in next sc. Repeat. [36]
RND7:  36 sc around [36]
RND8:  36 sc around [36]
RND9:  36 sc around [36]
Slip stitch to finish off,  leave a long length for stitching (will be used to stitch base to shell). 30-40cm should be more than enough.

Turtle: Underside

Brown Yarn
RND1:  6sc magic circle [6]
RND2:  2sc in each sc [12]
RND3:  sc in next sc, 2sc in next sc. Repeat. [18]
RND4:  sc in next 2 sc, 2sc in next sc. Repeat. [24]
RND5:  sc in next 3 sc, 2sc in next sc. Repeat. [30]
RND6:  sc in next 4 sc, 2 sc in next sc. Repeat. [36]
Slip stitch to finish off, trim excess yarn.

Turtle: Head

Light Green Yarn
RND1:  5sc magic circle [5]
RND2:  2sc in each sc [10]
RND3:  sc in next sc, 2sc in next sc. Repeat. [15]
RND4:  15 sc around [15]
RND5:  15 sc around [15]
RND6:  15 sc around [15] **insert safety eyes & embroider mouth**
RND7:  sc in next sc, sc2tog. Repeat. [10]
RND8:  10 sc around [10] **stuff head**
RND9:  10 sc around [10]
RND10: 10 sc around [10] – optional.
Add as many extra rounds of “10 sc around” as you like, depending on how long you want the neck. Remember, when the head is stitched to the body you will lose a round or two to the inside of the turtle.
Slip stitch to finish off, trim excess yarn.

Turtle: Legs (make 4)

Light Green Yarn
RND1:  4sc magic circle [4]
RND2:  2sc into first, 3 sc around [5]
RND3:  5 sc around [5]
RND4:  5 sc around [5]
Yes, the legs are easy but fiddly! For the sake of simplicity, once you have completed round 2 you can just keep single crocheting in each stitch around until the legs are the length you want. Just make sure all your legs are the same length!
Slip stitch to finish off, trim excess yarn.

Turtle: Tail 

Light Green Yarn
RND1:  4sc magic circle [4]
RND2:  sc in next sc, 2sc in next sc. Repeat. [6]
RND3:  sc in next 2 sc, 2sc in next sc. Repeat [8]
RND4:  8 sc around [8]
Slip stitch to finish off, trim excess yarn.

Assembly

Your turtle is assembled by stitching the top shell of the turtle to the underside. As you stitch the two together, you will gradually sandwich in the head, legs, and tail between the two and stitch them in. Look at my photos so you can see how it should look.

To visualise how your assembled turtle will look, place the underside on a flat surface. Position the ends of the head and tail on opposite sides of the circle, so that approximately one row of stitching overlaps and rests on the turtle underside. Do the same for the legs. Now position the shell over the top. This is how your turtle will look when finished. Now, you can either pin the head, tail, and legs in position to the underside so they will stay in place as you stitch around, or just remember where you will position them.

Stitching Together
1/ Using spare thread from the shell, use a yarn needle and sew the shell to the underside. The 36sc on the shell and the 36sc on the underside will match up to allow easy sewing (if you are unsure how to, use this website to help).
2/ As you stitch around and get to the point where you will need to add a body part, just sandwich in approx a row of the body part between the shell and the underside. Keep stitching as before, but just run the stitches straight through the body part so it all gets stitched neatly together! Easy peasy.
3/ Before you have nearly stitched up your turtle, stuff the body with polyfill.


Your turtle can now be decorated with other facial features (eyebrows, eyelashes, different mouth shapes), clothing (scarf, hats, pins), and whatever other embellishments you can think of. Enjoy! 😀


Note: You are free to use this pattern to make as many turtles as you like, but please do not post this pattern anywhere else. The pattern consists of basic crochet shapes so I imagine there are many, many similar turtles elsewhere! But if you follow my pattern exactly and  blog about it I would appreciate a link back to my website (so others can make it too!). I do not mind if you sell items you make from my patterns, but please be fair and acknowledge the pattern source. More information about pattern use here:
https://amysodyssey.wordpress.com/2010/07/26/my-crochet-patterns/
My Crochet Patterns

These are some answers to queries I have had about the use of my patterns. The information below is given briefly at the bottom of my patterns, but there was a need for it to be explained in more detail.

About Reproducing My Patterns…

The crochet patterns I have created and have posted here on my website will remain free and open for all to use. However I must insist that the patterns are not to be reproduced on any other website, magazine, book, etc.

Once a pattern starts getting reproduced (even with good intentions, such as those who want to translate it), the greater the chance the source will get lost over time, and the greater the chance that someone will try to claim it as their own and sell it. If you are able to help with any translating concerns others might have, I am happy for you to put a comment on the pattern page and provide a link to your email or website where you can offer advice, but I don’t want even translated patterns posted elsewhere.

About Selling Finished Products Made With My Patterns…

As I am providing the patterns for free, you are free to do whatever you like with the finished product. Gift, donate, sell, I don’t mind.

If you are selling the finished products online: I ask that credit is given to my pattern. So you are welcome to sell the bumblebees, flowers, etc that you make on your online store (etsy store, ebay store, etc), but please provide a link to the pattern on each page you sell the product from. This is also fair and honest for your customers. There are plenty out there who may like the finished products, but aren’t adept at crocheting. I would also appreciate a comment on the relevant pattern page giving a link to the online store (etsy, ebay, etc) you plan to sell the items in (do not advertise price etc – I will edit out blatant advertising) because 1) it’s good manners to let me know, and 2) it informs people where they can buy the finished products if they can’t/don’t want to make them.

If you are selling the finished products elsewhere (not on the internet): obviously it would be hard to insist on giving credit if you were selling the finished products at a school/church fete, market, swapmeet, etc, so I do not require credit in those situations. But of course it is good manners to mention where you found the pattern if anyone asks – keep up the free nature of the patterns!

Just a note: I wouldn’t advise selling products based on copyrighted characters (Day of the Tentacle, Dizzy), but that is your choice.

I obviously don’t imagine the patterns being used to make products sold in any huge commercial quanties, just crafty people who want to earn some extra money. And I am all for that!

Final Notes

I do not make any money from my website or patterns. I put in the hard work creating these patterns. I also do not make the products to sell myself (no time or inclination!). Insisting the patterns remain on this website and insisting that credit is given to my patterns if you choose to sell the finished product online are fair requests. I hope you understand these requests!

Keep enjoying the patterns,

Amy 😀

Singapore Shopping

Okay, so shopping on Orchard Road in Singapore had to be one of my favourite activities in Sinapore 😀  I come from Perth “city” where the shopping experiences are okay, full of franchises, and very repetitive – you will generally see the same stores all throughout the metro area. Orchard Road in Singapore was full of variety, and the malls were big, dry, and airconditioned. Now I can manage the heat in Singapore (I experience much hotter in summer in Perth), but I cannot cope with the humidity – dizziness and headaches even while gulping down water. Thank goodness for the aircon. The shops also kept us dry from all the torrential thunderstorms that happened almost every day of our stay (I enjoy thunderstorms so that was quite fun!).

Books, clothes, accessories, fun stuff, computer and console games (kept the partner happy ;))…Ahhh it was great fun 😀

These little sassy stars fell from the sky and onto my Christmas tree just for Christmas, but you will find they can appear all year round :D. They can appear as a Mario Invincibility Star (and make friends with your Mario Mushrooms), as a garland for your bedroom, as a good luck charm on a birthday card, or even as cute little decorations on your scarf.

There are lots of different crochet patterns out there for stars, but as usual I like to try my own! I wanted one that was small, easy, based off the Amigurumi style of crocheting and didn’t require me to cut the yarn at the end of each star arm. So lets get straight into the pattern.

Super Stars Amigurumi Pattern

My patterns are written down as I create my crochet patterns, but let me know if there is anything missing.

Techniques

You will use the basic amigurumi crochet techniques: magic circle, slip stitch, single crochet (sc), half double crochet (hdc), double crochet (dc), and triple/treble crochet (tr). The hdc and dc are demonstrated in the sweet spring flowers crochet tutorial.
The triple/treble crochet stitch is similar: yarn over twice, insert into stitch, yarn over again, pull through, then yarn over. You should have five loops on your hook. If you count the loops starting from your hook (i.e. the one nearest to your hook is #1 and your most recent yarn over; the one at the end is #5 was the one originally on your hook), pull through lops 2&3. Yarn over again – you will have four loops on your hook. Pull through the new loops 2&3. Yarn over again – you will now have three loops left. Pull through the final two loops (2&3), and you will have one loop left on your hook – congratulations, you have done a treble crochet! As soon as I get around to making my crochet stitch photo tutorial, I will remove this lengthy description 😛
Note: US crochet stitch terminology is used.

Materials

* Yarn in whatever colour you like (plus black yarn if you want faces)
* Crochet Hook
* Needle (if you want to do faces or sew two stars together)
* Ribbon, etc, if you want to make a garland.

Pattern

RND1:  5sc magic circle [5]
Slip stitch to join (you don’t have to though)
RND2:  3sc in next sc. Repeat [15]
Slip stitch to join (you don’t have to though)

RND3:  you will use three stitches per star arm (i.e. 3×5 arms = the 15 stitches from the previous round ;)). What you need to do in each of these three stitches for a star arm is explained next:
In first stitch: slip stitch then chain 1.
In the second stitch: half double crochet, chain 1, triple/treble crochet, chain 1 or 2 [*see below]
In the third stitch: double crochet, half double crochet, chain 1.

Now repeat these steps for each star arm. Slip stitch and knot to finish off. Give each star arm a pinch to make it a bit more pointed.

*= whether you chain 1 or 2 at this point will depend on your yarn thickness, hook size, and/or your tension. I found that when I used a smaller hook I needed 2 chains to make a nicer point, but with the same yarn and a larger hook I only needed 1 chain (as 2 made a big gap). Play around and see what looks best!


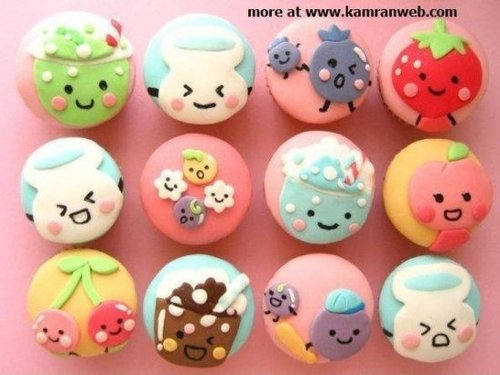
Kawaii cupcake faces for inspiration! **Click photo for source**

Decorate and use your star as you please! I stitched kawaii (cute) faces on mine with some black yarn.

A few ideas…
You can attach spare yarn or ribbon to the top to use as a Christmas tree ornament, or string a bunch of stars together as a garland. The stars can be attached to other crochet items, such as blankets, scarves, hats, toys, or to other items like hair clips, bags, hairbands, etc. You may also like to make a second star to stitch to the first (to hide the stitches on the back of the face), which you can fill with stuffing, cloves, potpurri, etc.

Note: Although this pattern is so basic it would have been made many times before, do not repost my writing anywhere else! More information about pattern use here: https://amysodyssey.wordpress.com/2010/07/26/my-crochet-patterns/

I’m half crazy, all for the love of you

It won’t be a stylish marriage

I can’t afford a carriage

But you’ll look sweet on the seat

Of a bicycle built for two!

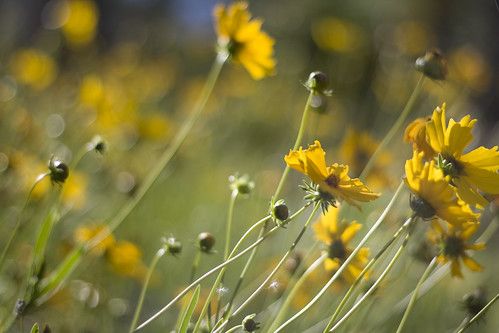
My Nanna seems to always sing this whenever she sees daisies…so the first two lines always pops in my head too whenever I see them now! More daisies for my welcome to summer – and a reminder of summer for those of you in the north of the world ;) . Until January 4th I’ll have the wordpress snow on my pages, so it is quite interesting to see snow falling over my daisies!

Mini Mario Mushroom Amigurumi

The mini mushrooms in the world of Mario are tasked with many things. The little red ones have the special job of helping Mario and his friends grow bigger and stronger to assist them on their adventures.

However, not all the mushrooms are sure of their fate. This mini Mario Mushroom is questioning whether it is really his destiny to help people grow large. He is off on a journey of self discovery, to see whether he can find a more fulfilling place in the world. So far he has become enamoured with the idea of Christmas, and plans to spend the next month as an ornament on a Christmas tree. He is waiting for my tree to go up, so he is practising in a Christmas-tree-like bush in my backyard.

He is very grateful for my hospitality and has shared with me the secret of how the mini mushrooms are created. He is very emphatic that more mushrooms should have the opportunity to find their destiny too, so make sure you mix up the colours and embellishments to create your own individual mushies :D They would love to hang out with you this Christmas, so make sure to make a bunch of them to pop on your tree, hang up as a garland, or put in a bowl with pinecones and other lovely Christmassy-smelling stuff.

Mini Mario Mushroom Amigurumi Pattern

My patterns are written down as I create my amigurumi, but let me know if there is anything missing.

Techniques

You will use the basic amigurumi crochet techniques: magic circle, slip stitch, single crochet (sc), increase, and invisible decrease.
Note: US crochet stitch terminology is used. ch=chain, sc=single crochet, 2sc in next sc=increase, sc2tog=decrease (crochet two sc together to make one sc). I use the invisible decrease method for all decreases.

Materials

* Yarn: Red, White, and Scrap length of Black for the eyes (but try all different colours for your mushrooms!)
* Polyfill stuffing
* Crochet Hook
* Needle (one with an eye big enough for yarn, and one for your embroidery thread)
* Optional: other decorative items (e.g. beads, buttons, sequins)

Pattern

Mushroom

Start with Red Yarn

RND1:  6sc magic circle [6]
RND2:  2sc in next sc. Repeat [12]
RND3:  sc in next sc, 2sc in next sc. Repeat [18]
RND4:  sc in next 2 sc, 2sc in next sc. Repeat [24]
RND5:  24 sc around [24]
RND6:  24 sc around [24]
RND7:  24 sc around [24]
RND8:  24 sc around [24]
RND9:  sc2tog. Repeat [12]
**Slip stitch in back stitch only to add in white.**
RND10: 12 sc around in back stitch only for this round [12]
RND11: sc in 2 sc, 2sc in next sc. Repeat [16]
RND12: 14 sc around [16]
RND13: sc2tog. Repeat [8] **stuff mushroom**
RND14: sc2tog. Repeat [4]
Slip stitch and finish off.

Mushroom: Spots [make 3-4 in white]

RND1:  4sc magic circle [4]
RND2:  2sc in next sc. Repeat [8]
RND3:  sc in next sc, 2sc in next sc. Repeat [12]
Slip stitch and finish off. Leave a long yarn for sewing.
Sew spots to top of mushroom.

Whip stitch (just stitch “over-and-under” a couple of times with needle and black yarn) eyes onto white part of mushroom.

Mini Mario Mushroom Amigurumi

The mini mushrooms in the world of Mario are tasked with many things. The little red ones have the special job of helping Mario and his friends grow bigger and stronger to assist them on their adventures.

However, not all the mushrooms are sure of their fate. This mini Mario Mushroom is questioning whether it is really his destiny to help people grow large. He is off on a journey of self discovery, to see whether he can find a more fulfilling place in the world. So far he has become enamoured with the idea of Christmas, and plans to spend the next month as an ornament on a Christmas tree. He is waiting for my tree to go up, so he is practising in a Christmas-tree-like bush in my backyard.

He is very grateful for my hospitality and has shared with me the secret of how the mini mushrooms are created. He is very emphatic that more mushrooms should have the opportunity to find their destiny too, so make sure you mix up the colours and embellishments to create your own individual mushies 😀 They would love to hang out with you this Christmas, so make sure to make a bunch of them to pop on your tree, hang up as a garland, or put in a bowl with pinecones and other lovely Christmassy-smelling stuff.

Mini Mario Mushroom Amigurumi Pattern

My patterns are written down as I create my amigurumi, but let me know if there is anything missing.

Techniques

You will use the basic amigurumi crochet techniques: magic circle, slip stitch, single crochet (sc), increase, and invisible decrease.
Note: US crochet stitch terminology is used. ch=chain, sc=single crochet, 2sc in next sc=increase, sc2tog=decrease (crochet two sc together to make one sc). I use the invisible decrease method for all decreases.

Materials

* Yarn: Red, White, and Scrap length of Black for the eyes (but try all different colours for your mushrooms!)
* Polyfill stuffing
* Crochet Hook
* Needle (one with an eye big enough for yarn, and one for your embroidery thread)
* Optional: other decorative items (e.g. beads, buttons, sequins)

Pattern

Mushroom

Start with Red Yarn

RND1:  6sc magic circle [6]
RND2:  2sc in next sc. Repeat [12]
RND3:  sc in next sc, 2sc in next sc. Repeat [18]
RND4:  sc in next 2 sc, 2sc in next sc. Repeat [24]
RND5:  24 sc around [24]
RND6:  24 sc around [24]
RND7:  24 sc around [24]
RND8:  24 sc around [24]
RND9:  sc2tog. Repeat [12]
**Slip stitch in back stitch only to add in white.**
RND10: 12 sc around in back stitch only for this round [12]
RND11: sc in 2 sc, 2sc in next sc. Repeat [16]
RND12: 16 sc around [16]
RND13: sc2tog. Repeat [8] **stuff mushroom**
RND14: sc2tog. Repeat [4]
Slip stitch and finish off.

Mushroom: Spots [make 3-4 in white]

RND1:  4sc magic circle [4]
RND2:  2sc in next sc. Repeat [8]
RND3:  sc in next sc, 2sc in next sc. Repeat [12]
Slip stitch and finish off. Leave a long yarn for sewing.
Sew spots to top of mushroom.

Whip stitch (just stitch “over-and-under” a couple of times with needle and black yarn) eyes onto white part of mushroom.

Now send your mushroom off on an adventurous journey! These mushrooms would love to hang out with you this Christmas, so make sure to make a bunch of them to pop on your tree, hang up as a garland, or put in a bowl with pinecones and other lovely Christmassy-smelling stuff. If you would like to make a much bigger mario mushroom, WolfDreamer has learnt the secrets of a big one.

Note: I developed this pattern myself, but it is so basic it would have been made many times before! I would still love a link and to see your creations in the comments if you found this helpful 😀 More information about pattern use here: https://amysodyssey.wordpress.com/2010/07/26/my-crochet-patterns/